Rails App
Phase Eight - SCSS Introduction
Let’s take a little bit of time to improve the overall look and feel of the site. We won’t get very deep in to this aspect (there’s another entire course here just on this aspect of software development), but we can at least make a few things flow a bit better and also explore SASS a bit.
Fonts
Twitter Bootstrap uses a Font-Family of Helvetica Neue, Helvetica, or Arial (depending on your operating system) as the default font. Let’s use a different font that we can get from Google Fonts. While you can spend a lot of time searching for the perfect font, for now just search for “Roboto” and click the “Add to Collection” button.
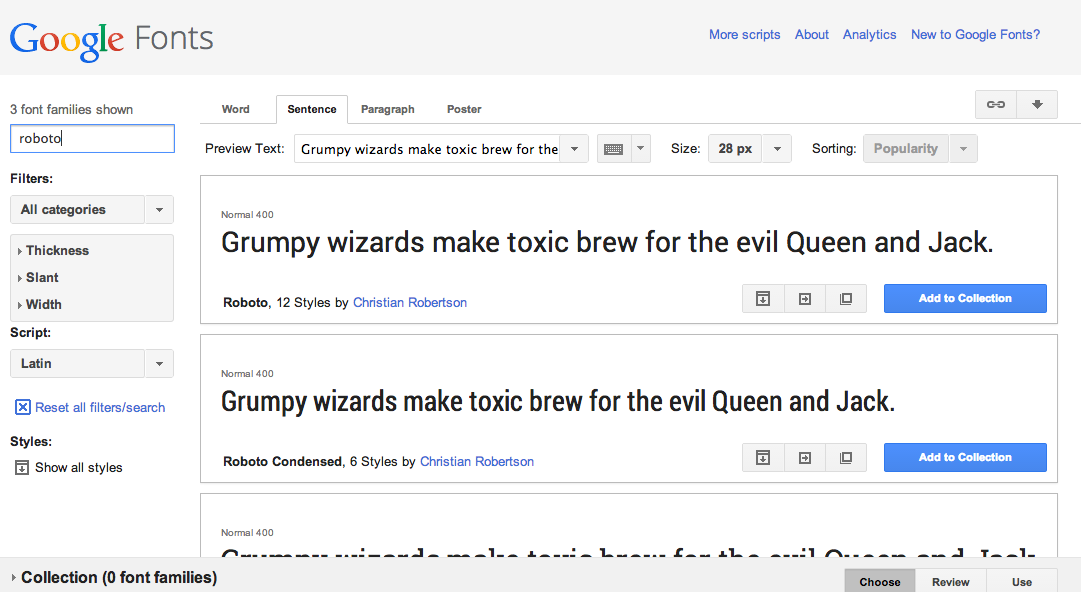
You can add additional fonts to a collection, but we can get by with just one for now. Click on the “Use” tab and you’ll be directed to a page that allows you to select which font weights you need for your application. If you scroll down, you will see a section 3. Add this code to your website:.
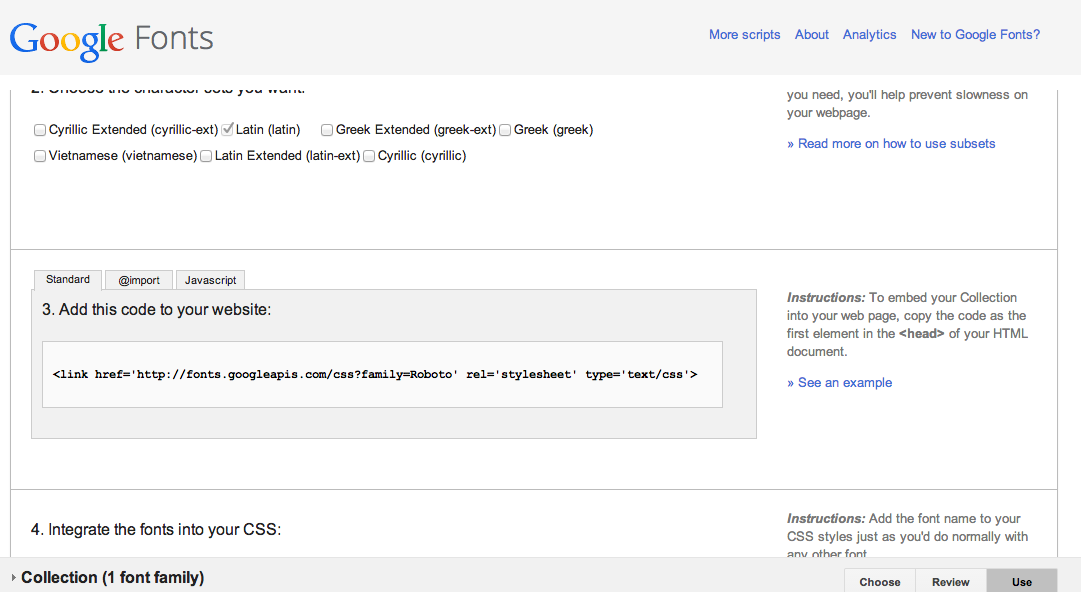
Copy the link from the webpage, then open app/views/layouts/application.html.erb.
Below the <title>Scriba</title> line, add the copied content from Google.
<link href='http://fonts.googleapis.com/css?family=Roboto' rel='stylesheet' type='text/css'>If you want, you can also change this to use the Rails helper function for stylesheets:
<%= stylesheet_link_tag "http://fonts.googleapis.com/css?family=Roboto" %>Now that we have the new font available, we need to tell our application to use
it. Open up app/assets/stylesheets/transcriptions.css.scss. Let’s change the
font family for the CSS children of the body element.
body { padding-top: 100px; font-family: Roboto, sans-serif;}Now start your Rails server (bin/rails server) if it’s not already running.
Do you see a difference? What’s going on here?
Remember, browsers apply the last read CSS rules to the page, and we’re loading
the CSS rules for Bootstrap after the rules we are calling (through Rails in
application.css). To fix this, we just need to reorder how the CSS files are
loaded. In app/views/layouts/application.html.erb fix the stylesheet lines to
read like this:
<%= stylesheet_link_tag "//maxcdn.bootstrapcdn.com/bootstrap/3.2.0/css/bootstrap.min.css" %>
<%= stylesheet_link_tag "//maxcdn.bootstrapcdn.com/bootstrap/3.2.0/css/bootstrap-theme.min.css" %>
<%= stylesheet_link_tag "http://fonts.googleapis.com/css?family=Roboto" %>
<%= stylesheet_link_tag 'application', media: 'all', 'data-turbolinks-track' => true %>
Now reload the page (you don’t need to restart your rails server). Did the changes get applied? If you’re unsure you can check out browser extensions like WhatFont to help you get a more nuanced read on your fonts.
SCSS Variables
CSS as a language only provides text-based rules for browsers. However, this makes you type a lot of things over and over. This is where “SCSS” (and other CSS preprocessors like less) help you be more productive and have fewer issues in your development cycle. There are a few things like this that you will find that you use throughout your application, like colors and fonts.
Let’s set some color variables. In app/assets/stylesheets/transcriptions.css.scss,
before the rule for body, add these lines to define some colors we can use
throughout the site:
$base-color: #AD141E;
$lightgray: #999;
$black: #000;
$white: #FFF;
Now, anytime you want to use a color, you can use the a descriptive name.
h1 {color: $lightgray;}SCSS Nesting
SCSS allows you to “nest” CSS rules. This is a way to explicitly state things
like only the li elements in the nav element contained in the header
element get these styles, in a readible manner.
nav {
  ul {
    li {
      display: inline-block;
    }
  }
}
SCSS Mixins
If you spend much time with CSS, you’ll discover every major browser implements the HTML specificiation slightly differently, requiring you to use what are known as “vendor prefixes”. This is a pain, but SCSS has a conventions known as a mixin that allows you to handle this in a more sane manner.
A common use for this is for things like boxes around text that get fancy with
rounded corners. In CSS we do this with the border-radius, and for each
element we want to have this styling, we would need to define it for webkit
(Safari and Chrome), mozilla (Firefox), Internet Explorer (ugh), and a catch-all.
We can use SCSS to create a block of code that we can call from different places in the stylesheet to reuse this code:
@mixin border-radius($radius) {
  -webkit-border-radius: $radius;
  -moz-border-radius: $radius;
  -ms-border-radius: $radius;
  border-radius: $radius;
}

.box {
  @include border-radius(10px);
}
SCSS Functions
SCSS also has functions that allow you to do a lot of manipulations without having to do the math yourself. Instead of opening up a color wheel and figuring out what hex value is 20% darker (or lighter) than a given color, or even set a transparancy layer, you can use a function.
$base-color: #AD141E;
$lighter: lighten($base-color, 20% );
$darker: darken($base-color, 20% );
$transparent: rgba($base-color, 0.7 );
You can start putting these together in interesting ways to develop complex CSS rules. Let’s make a SCSS rule for a new element we can add to the landing page of the app that uses a mixin (for box shadows), functions to change the color, and remain pretty readable.
@mixin box-shadow($top, $left, $blur, $size, $color, $inset: false) {
  @if $inset {
      -webkit-box-shadow:inset $top $left $blur $size $color;
      -moz-box-shadow:inset $top $left $blur $size $color;
      box-shadow:inset $top $left $blur $size $color;
  } @else {
      -webkit-box-shadow: $top $left $blur $size $color;
      -moz-box-shadow: $top $left $blur $size $color;
      box-shadow: $top $left $blur $size $color;
  }
}

@mixin border-radius($radius) {
  -webkit-border-radius: $radius;
  -moz-border-radius: $radius;
  -ms-border-radius: $radius;
  border-radius: $radius;
}


$base-color: #AD141E;
$white: #FFF;

.intro-box {
  padding: 10px;
  background: $base-color;
  color: darken($white, 15%);
  border: 1px solid darken($base-color, 20%);
  text-shadow: 0 -1px 0 darken($base-color, 10%);
  @include box-shadow(0, 1px, 0, lighten($base-color, 20%), inset);
  @include border-radius(10px);
}
If you refresh your page, you’ll see that the CSS generated from this is
.intro-box {
  padding: 10px;
  background: #ad141e;
  color: #d9d9d9;
  border: 1px solid #52090e;
  text-shadow: 0 -1px 0 #7f0f16;
  -webkit-box-shadow: 0 1px 0 #e93e49 inset;
  -moz-box-shadow: 0 1px 0 #e93e49 inset;
  box-shadow: 0 1px 0 #e93e49 inset;
  -webkit-border-radius: 10px;
  -moz-border-radius: 10px;
  -ms-border-radius: 10px;
  border-radius: 10px;
}
Ok, so we have something that defines an intro box, let’s add it to the page.
Open app/views/transcriptions/index.html.erb (the root route we set earlier)
and add a div element with a class of intro-box with some lorem ipsum in
it.
<div class="intro-box">
<p>Lorem ipsum dolor sit amet, consectetur adipisicing elit, sed do eiusmod tempor incididunt ut labore et dolore magna aliqua. Ut enim ad minim veniam, quis nostrud exercitation ullamco laboris nisi ut aliquip ex ea commodo consequat. Duis aute irure dolor in reprehenderit in voluptate velit esse cillum dolore eu fugiat nulla pariatur. Excepteur sint occaecat cupidatat non proident, sunt in culpa qui officia deserunt mollit anim id est laborum.</p>
</div>
If you navigate to the home page, you should see something like this:

Summary
We just went through some of the things that SCSS, which is included with Rails, allows you to do. Just remember, if you don’t get the language, plain-old CSS works in these files too. This is especially useful if you’re taking an older CSS implementation to migrate in to a Rails application. This section went over some of the ways you can use the SCSS to add styles to your site, and, in the next module, we’ll update the user interface and use custom styles (and styles built in from Twitter Bootstrap) to improve how users interact with the application.